I was about to render a modelled scene properly for the first time, I double checked all the render settings to make sure there was nothing unnecessary being rendered. Also making sure that the individual frames were exported in JPEG format and the quality was at HD 1080. The first scene I rendered was the time-lapse scene which consisted of a total of 120 frames. I started the render at around 3:30pm and I knew it would take longer than a few hours to render the scene so I spoke to Steve from IT resources and he said it would be okay for me to leave it rendering over night to avoid the batch render cancelling as they computers shut off automatically at just after 9pm normally. He was able to change the permissions on the particular computer I was rendering on to stay on, and the scene was able to render throughout the night. I came in at around 9:30am the following day and the scene had rendered around 17 frames during the 18 hours it had been rendering, so it was taking around an hour per frame. It was too slow to be viable so I spoke to Mat and he said it would be okay to render across several computers, since on this particular day nothing was timetabled and the room was virtually empty. I loaded my work across three separate computers, dividing the work into thirds and allocating 30 frames to each of the computers. After setting everything up I went back to the IT resources and spoke to Mike, who said it would be fine to change the permissions on these computers as well, like Steve had previously done for me. I got the unique computer number from the towers of each computer and he was able to do it remotely from his office. Unfortunately after spending some time monitoring each of the computers I found that one continued to crash so I had to cut it down to two and render off of those instead of all three.
The initial environment shots I found took the longest to render because they essentially comprised every element that had been modelled, including the heavier elements such as the grass and fence, both made of polygons and together make up around two thirds of the scenes total content in terms of polygons. Due to this, I tried to get these scenes out of the way first while I worked on other less detailed scenes, such as the action taking place inside the barn. This ended up being a fairly efficient process and no time was really lost when you consider that the rendering took place in the background and luckily due to the available resources, could be left to render whilst other progress could be made on the project in other areas.
One thing I did do before each scene was rendered was render still frames at various points throughout the sequence, at a low quality so it didn't take up to much time. The reason for this was so I could look at the lighting and camera angles throughout the sequence and make any small modifications before the final scene was batch rendered, as I wanted to prevent being unhappy with how the frames looked or for example, how the scene was lit after half of the scenes frames had been rendered, thus wasting valuable time. I tried to be as thorough as I could be when setting up scenes to render and testing aspects such as the lighting. For various scenes I even changed the 'physical sun and sky' from a directional light to an ambient one, and changed the intensity to make it so there was a faint glow of white-blue light coming through the gaps between the planks that make up the barn. I found this added a cinematic element and looked a lot better than before when the outside was almost completely black, making the scene feel a little lacking overall. Another lighting consideration that I changed scene to scene was the interior lighting of the barn. Depending on the angle of the camera and the time of day outside the barn, the interior could become very dark and poorly lit. I decided to change the 'decay' on the lights to linear rather than quadratic, meaning there was more light in the scene. However, to balance this further I did have to change the intensity from 20 to around 2 - a tenth of the original intensity in order to compensate for the change in the decay settings. With this project in particular and the nature of the way rendering and production is conducted I made a special consideration to make sure that there was continuity from scene to scene. What I mean by this is that since each scene is created individually in terms of animation and direction, and then rendered by itself, it was important to make sure that aspects such as the time of day outside made sense when the various scenes are finally stitched together into a final sequence.
I ran into several problems whilst trying to render various scenes throughout the project. Some of which were quite easy to solve and others not so much. One of the strangest problems I encountered when trying to batch render a scene was that the rendering didn't complete and essentially said that rendering was completed without rendering any of the individual frames. Wing also encountered this problem whilst attempting to batch render the 'bouncing ball' scene. I believe the issue was with mental ray, but I never actually discovered the cause of the issue. I read through a lot of forum posts and a lot of the contributors suggested different causes to the problem, a lot of them didn't apply to mine and Wing's situation though. This particular problem first happened to me when rendering the scene with the poster affected by the wind. At first I thought it could be a memory issue, but after playing around for a couple of hours it was working again. It's strange because the main feature of the scene I was adjusting was the lighting, specifically the physical sun and sky. This leads me to believe the issue was with mental ray, or perhaps the translation to mental ray. One good thing that came from having to troubleshoot these issues is that I learnt how to use the script editor to try and discover the source of problems that were occurring. This will help me a lot in the future I think when I come across various issues.
Overall, the process of rendering in this was an invaluable experience in terms of time management, planning and in a way organisation. I found that it was vital considering the length it takes to render different scenes that it is implemented in an efficient way so as to waste as little time as possible. It showed me how important it is to make sure a scene is ready and to an extent before rendering for real.
Monday, 30 November 2015
OUAN504 - Animating, Entering the Barn
This is the first scene in the animation where we see the pigs. I tried to tie scenes together in an interesting and unsuspecting way by cutting suddenly form the previous scene which is where we see the poster on the wall into a lot of movement from the pig running into the barn with the camera following from behind, almost like a steady cam shot. This scene in particular probably took the most time out of the scenes I was allocated to animated. I think this was mostly because of the camera angles I was trying out, and attempting to make work. In the end I settled for a shot that begins outside of the barn and follows the 'strong pig' character as he charges into the barn and vaults on of the sty fences to 'rendezvous' with the other characters. I tried to create movement across all of the characters for this scene, for example even though it isn't clearly visible I tried to make sure there was overlapping movement across all of the characters during the duration of the scene. This gave me a good grasp of the situational aspects of the scene across different characters. The smart pig and young pig taking notice and becoming aware of the other character's arrival. As well as that, this was the first scene in which real animation outside the manipulation of the camera was involved and I wanted to make it as high quality as I could so that the audience gets an immediate sense of how the characters move and interact with the environment based on their proportions and size. The characters we designed are supposed to be relatively small, and coupled with this, their proportions are quite interesting as their limbs are short. The movement had to compliment this factor and so I did some research including reviewing 'The Animators Survival' guide in order to get solid information about how to over come this.

The animation came fairly easily, after a few frames I got the grasp of the way keyframe animation works in Maya and it became quite simple to control. It made me think in a way I've never thought about animation because instead of drawing a character over and over I was moving individual components of parts of a character in order to make them move. So, when I was creating the running sequence I would move the left arm and think about the movement in the right arm, then the legs and the body and head individually. I think this process gave me a better grasp overall about the nature of animation and the ways to think about movement. The movement involved in this scene was a run sequence followed by the character vaulting over the sty fence. The most difficult part I found was the run cycle due to the unusual limb lengths the character had. I did my best to follow a traditional method of creating the run cycle with a similar pattern, modifying it slightly to accommodate for the character's proportions. After this the vault was fairly straight forward and I used some references in order to get the correct positions throughout the duration of the vault, which lasts a short amount of time. During this movement from the 'strong' character, there was also movement from the other characters as they notice his arrival. I tried to make it look natural as if they turned their heads and came to attention as they saw him, hopefully this came off well.


Aforementioned the camera movement was a difficult decision during this particular scene, but in the end the shot following the pig as they enter the barn is one I quite liked and the shot the pans upwards during the vault and the remaining action in the scene worked quite well. Previously, it was difficult to find good camera positioning that documented this scene well, and showed the action in an interesting for the audience.
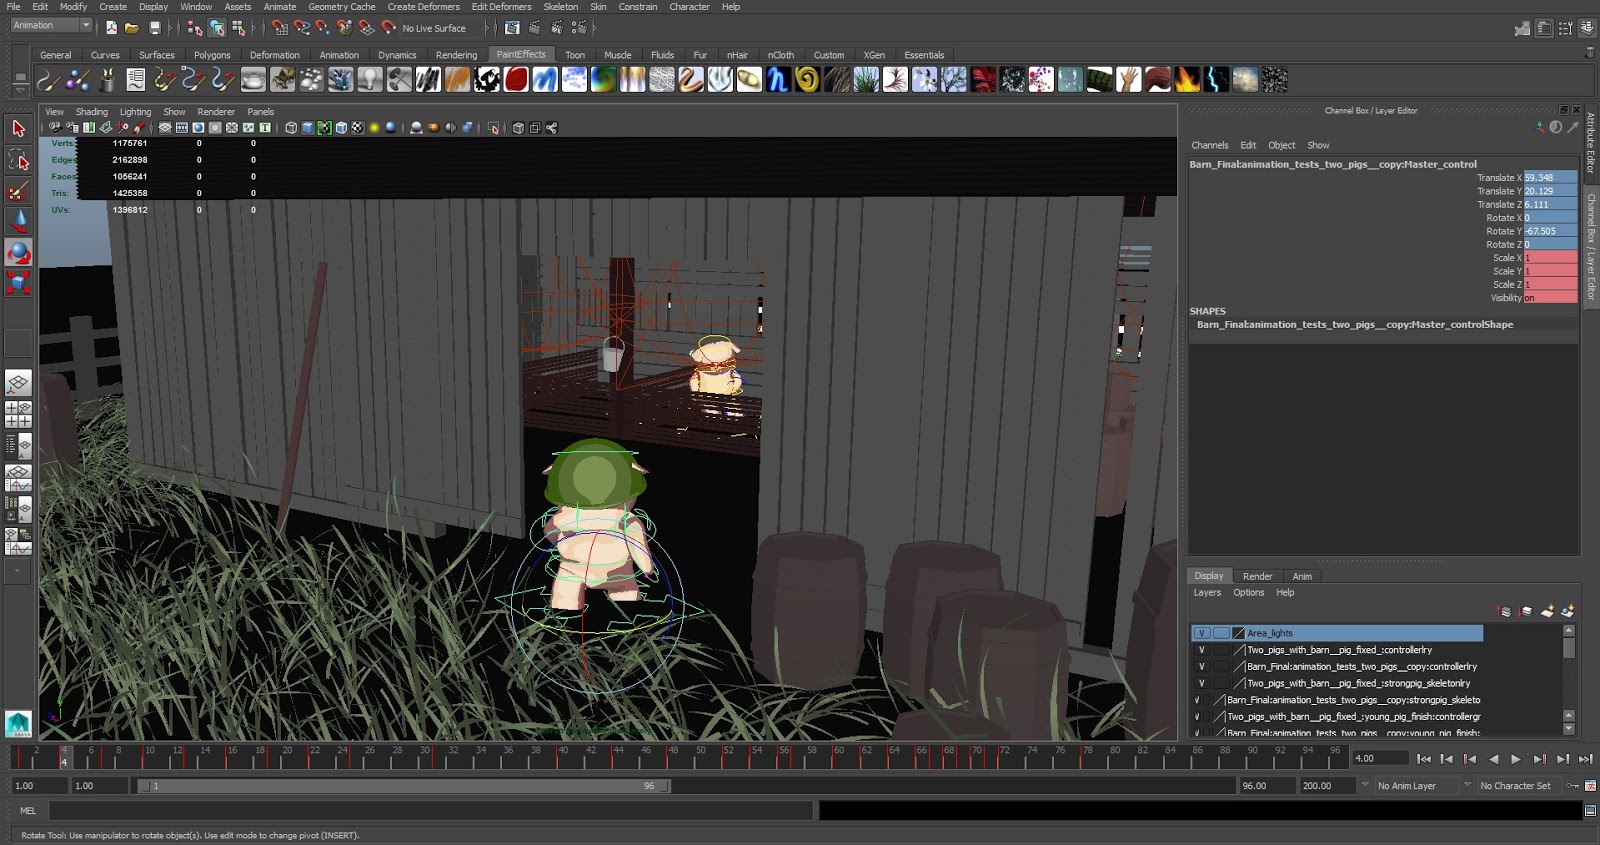
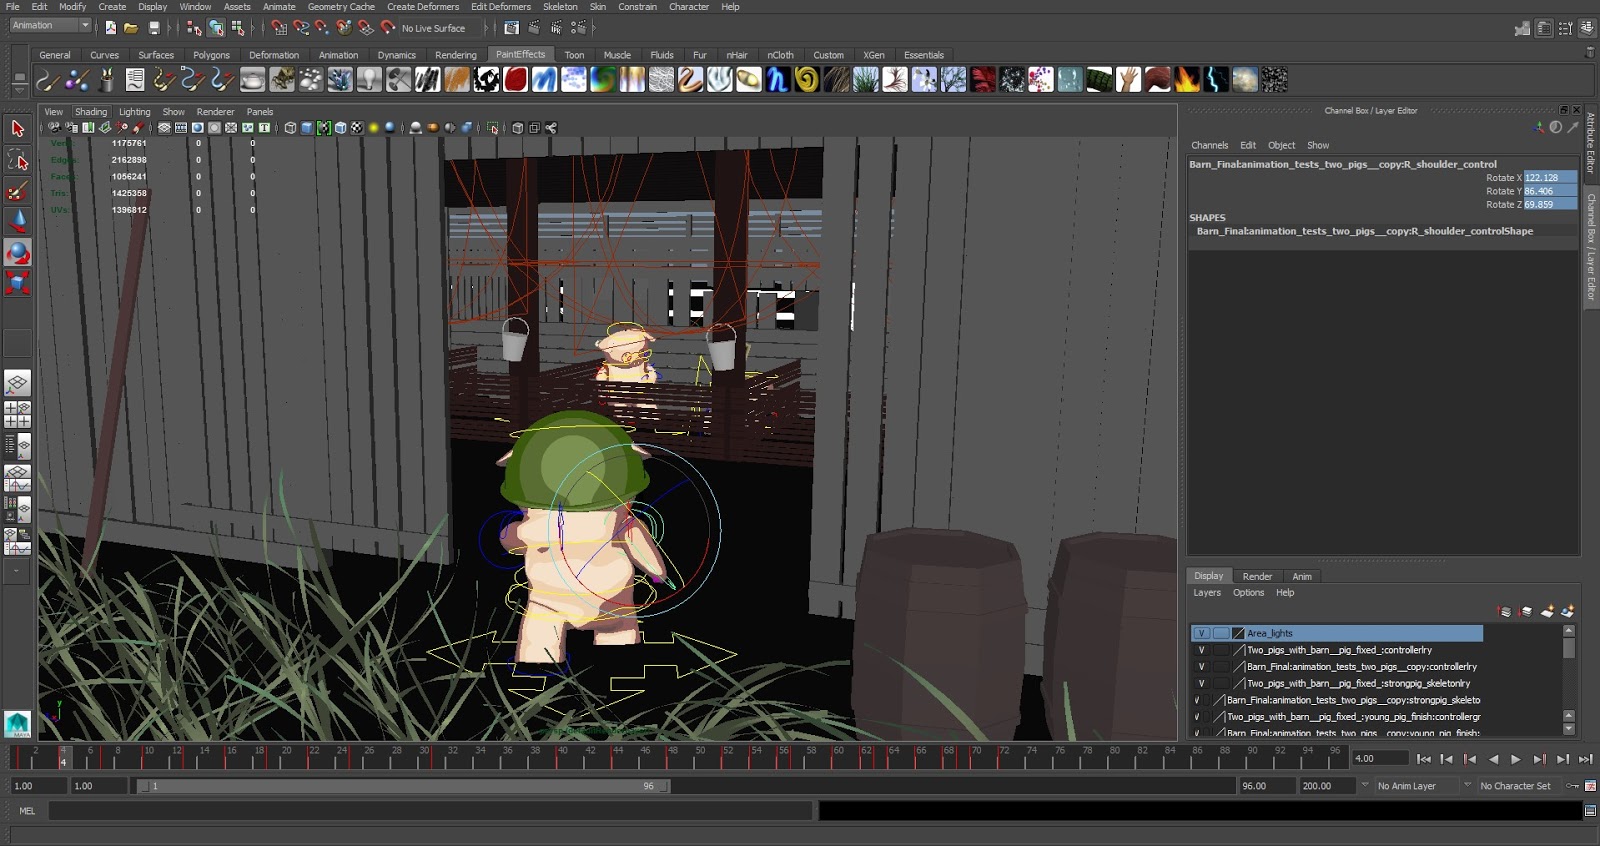
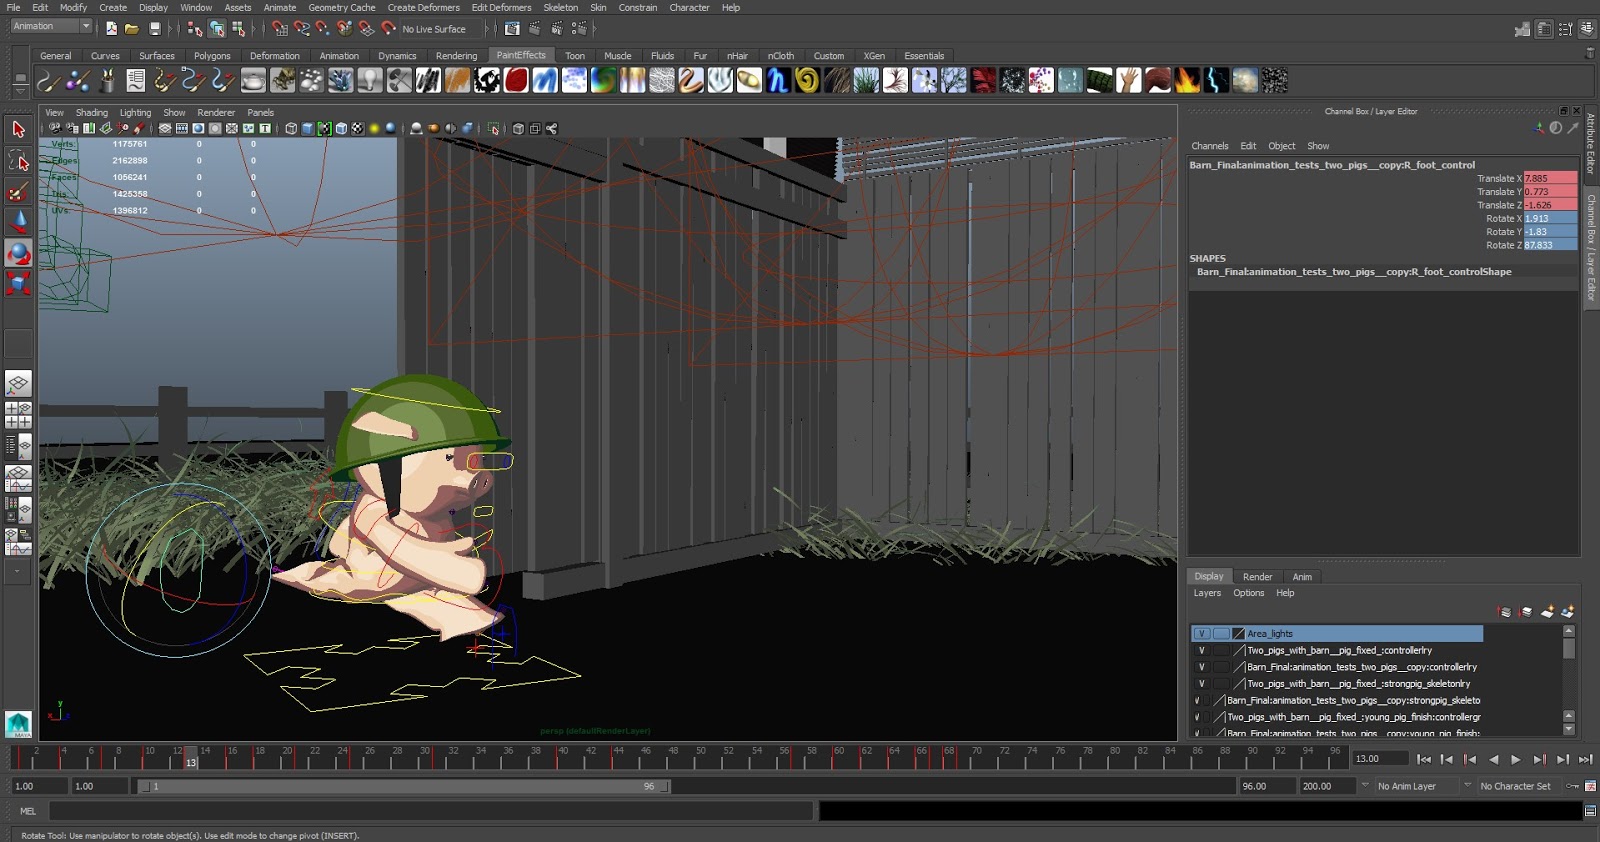
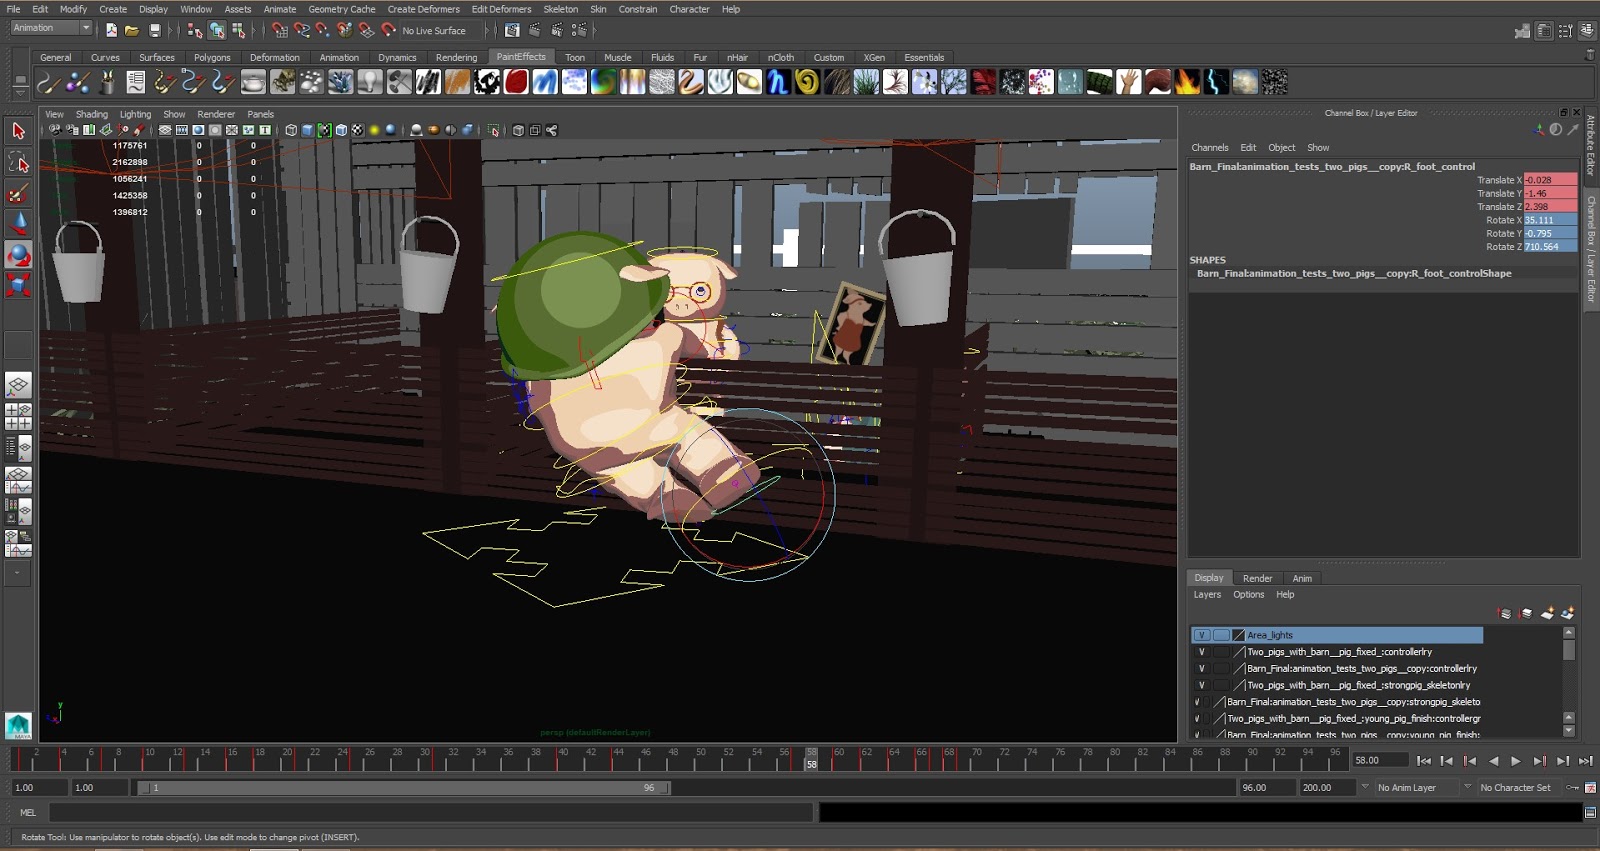
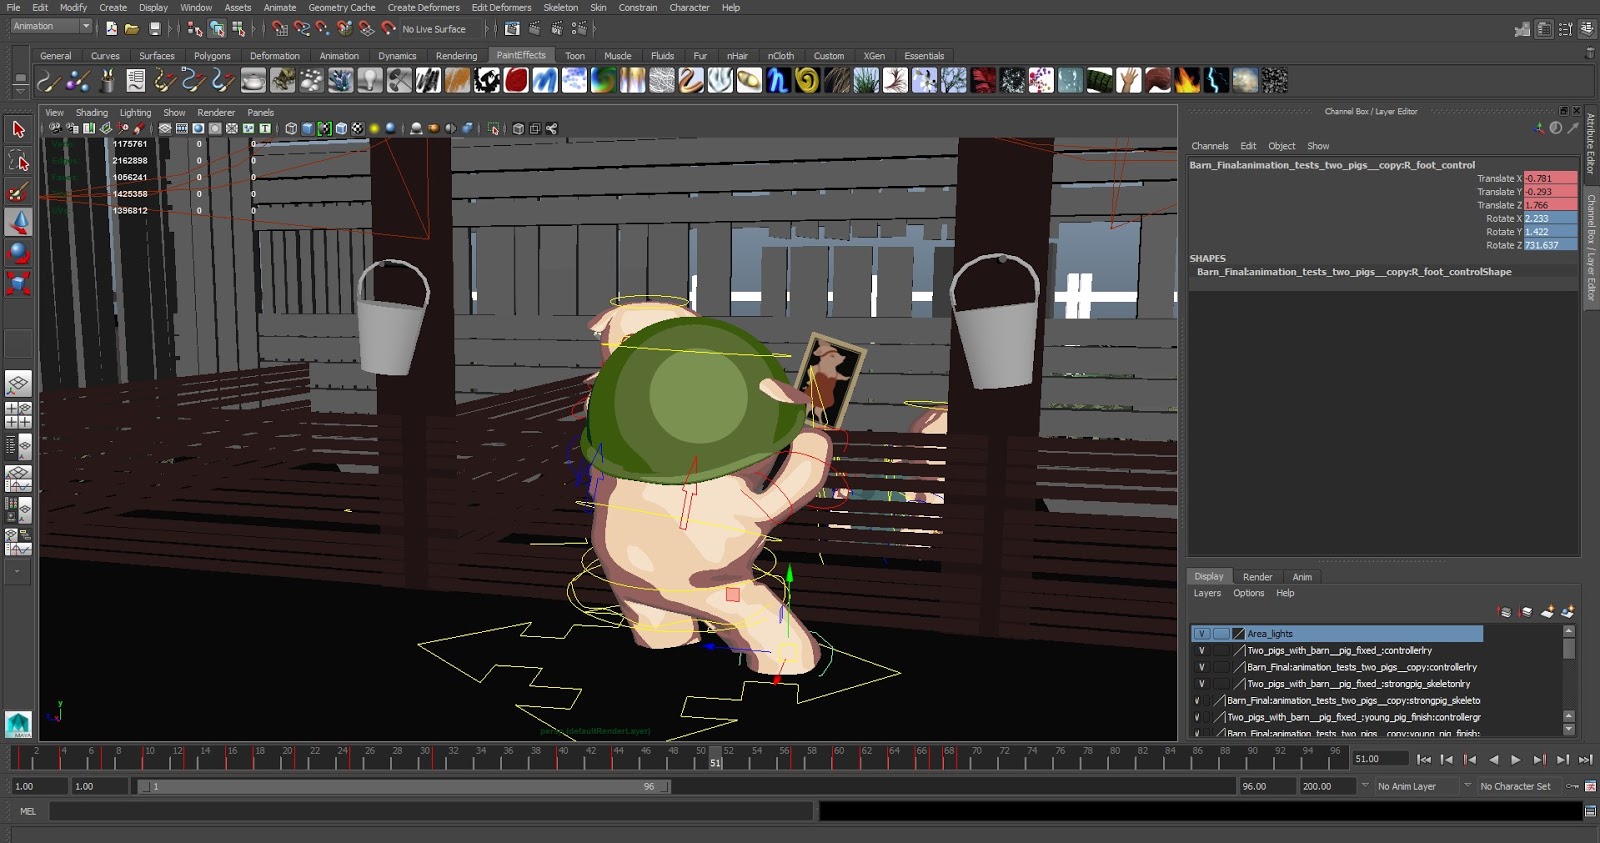
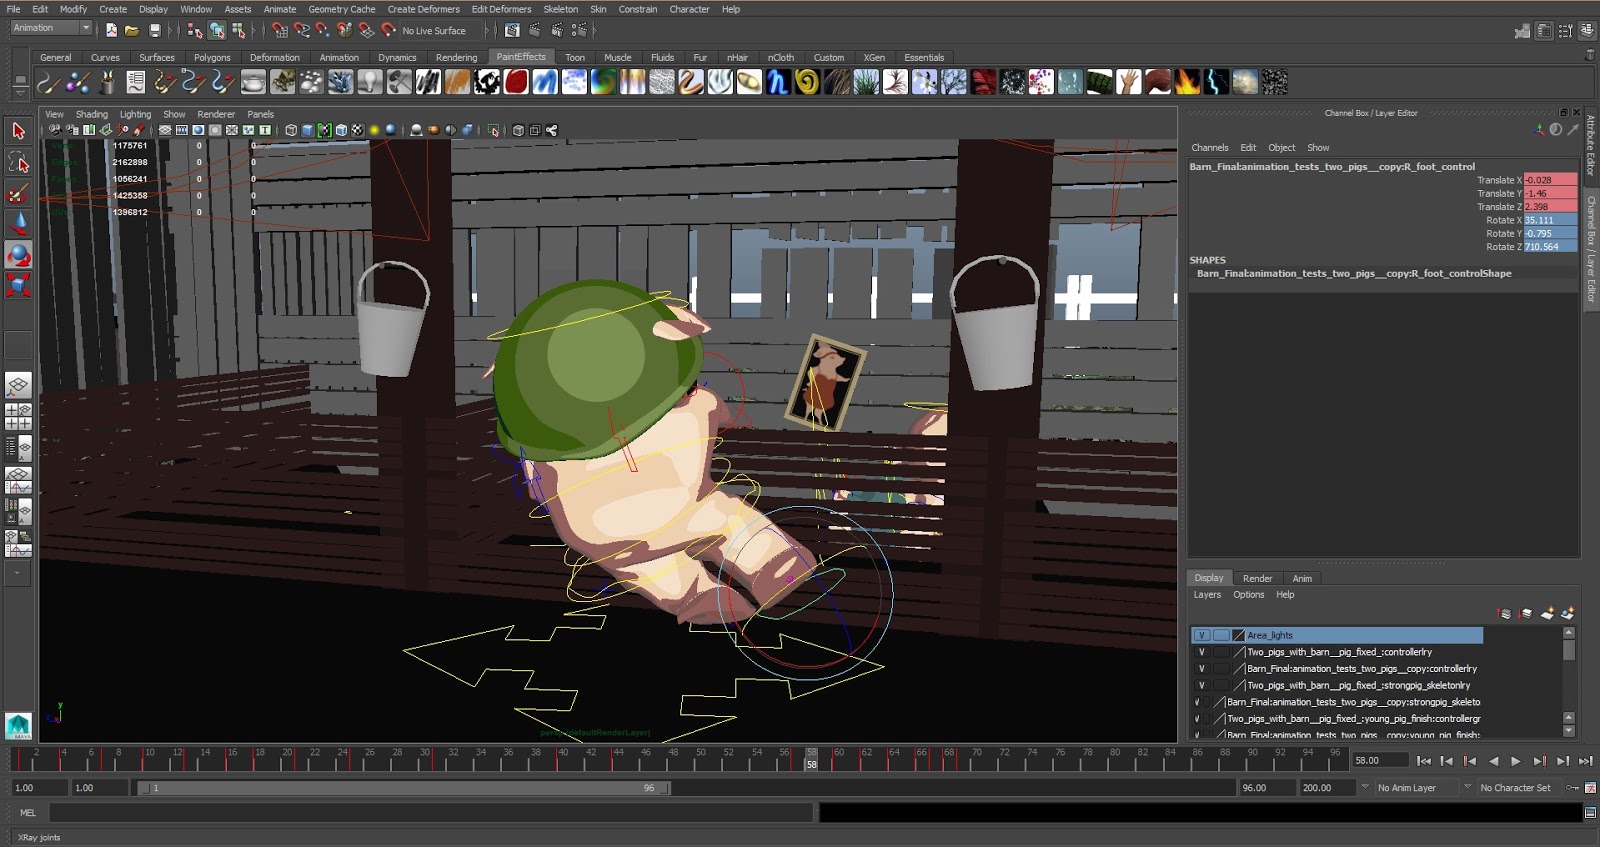
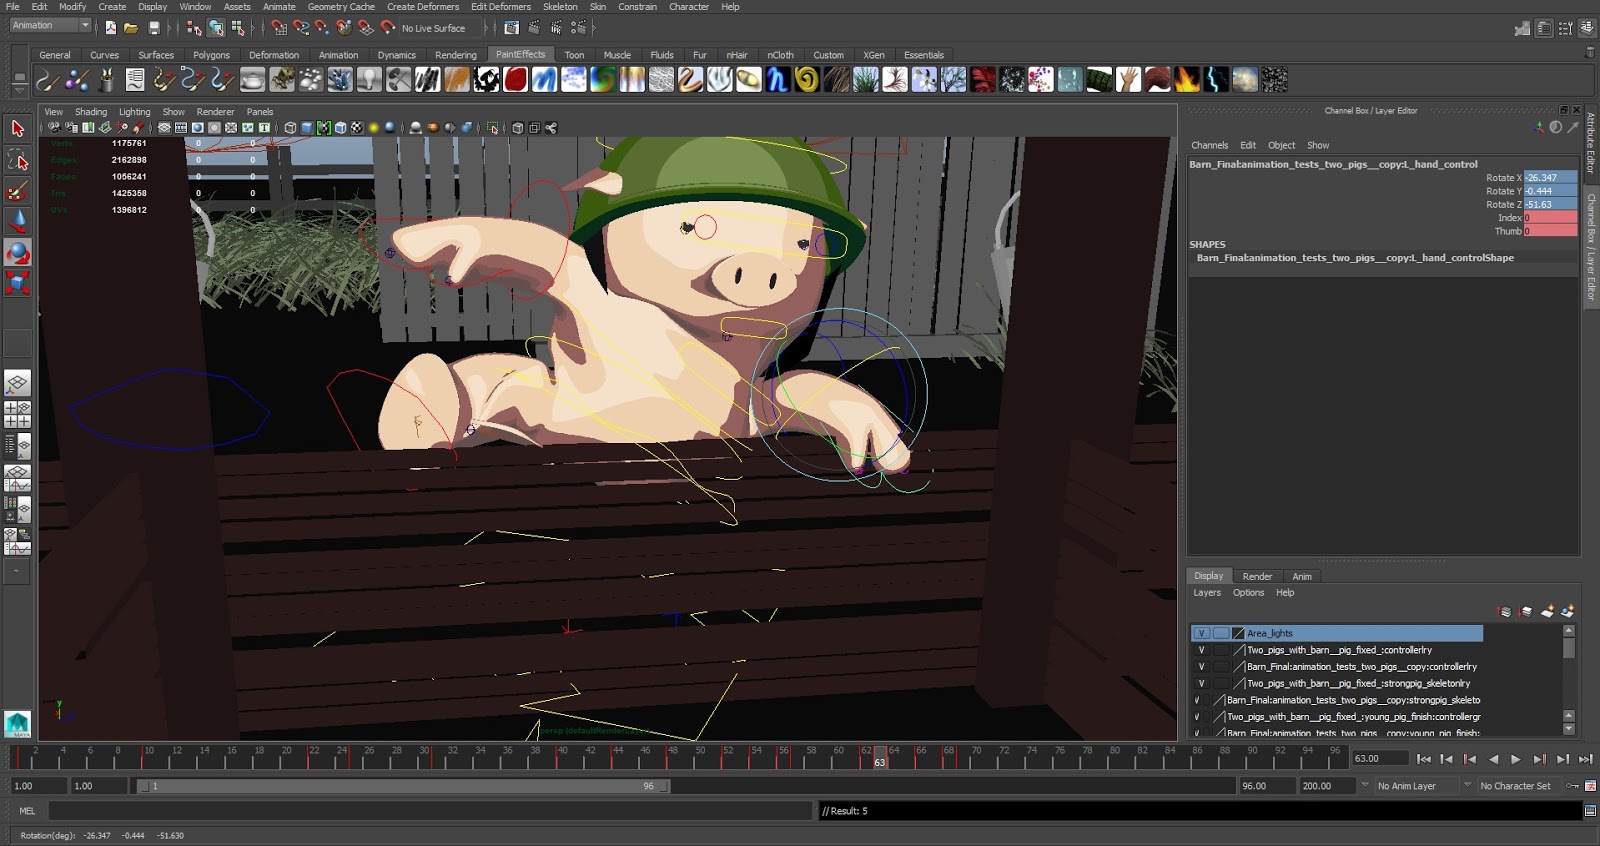
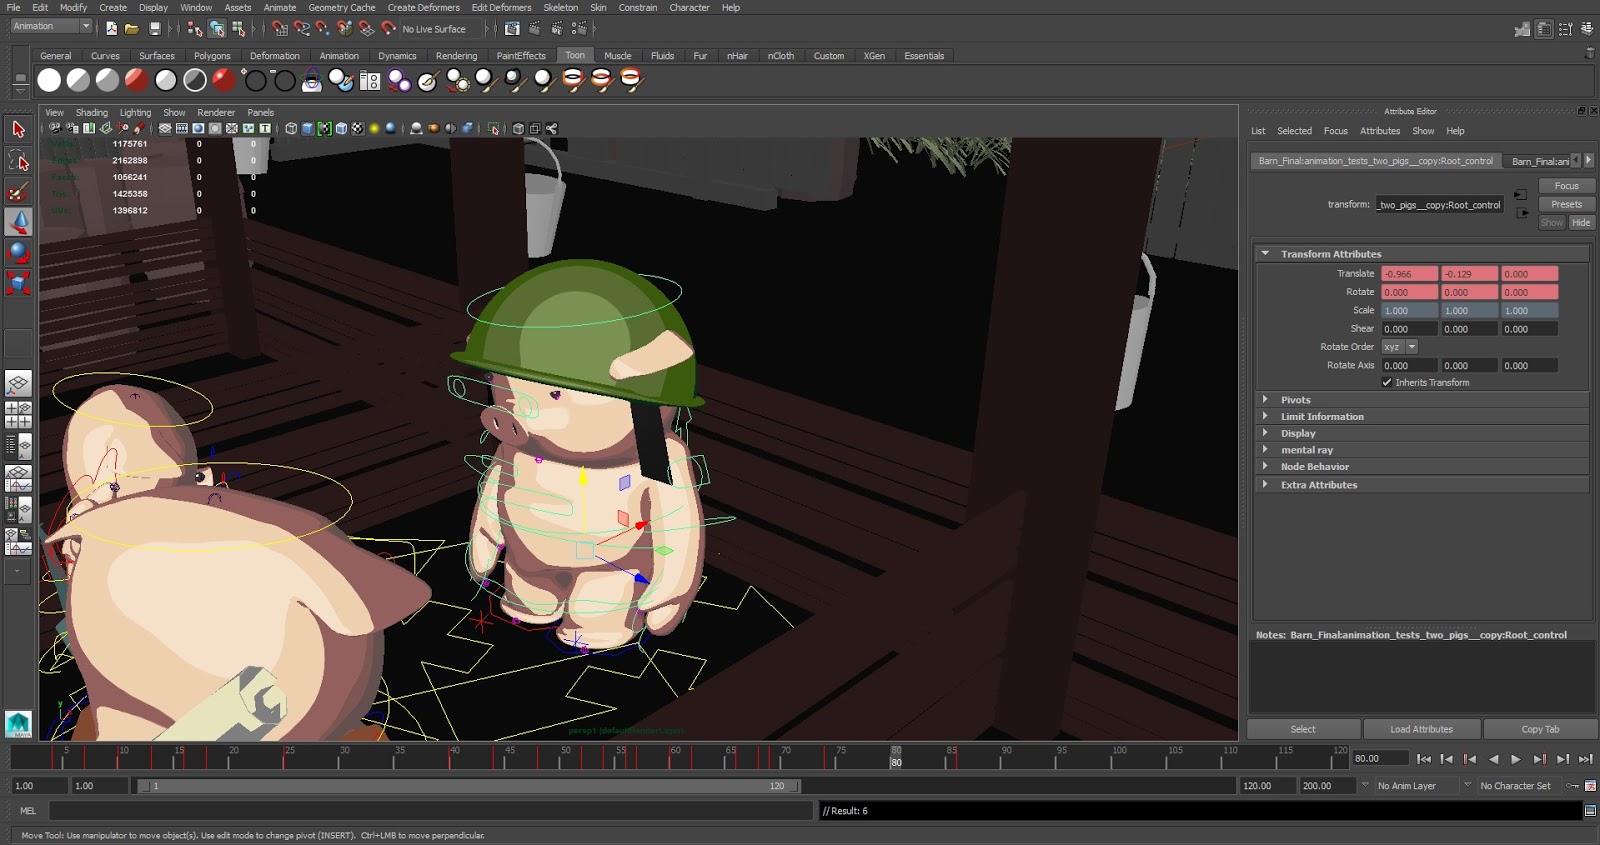
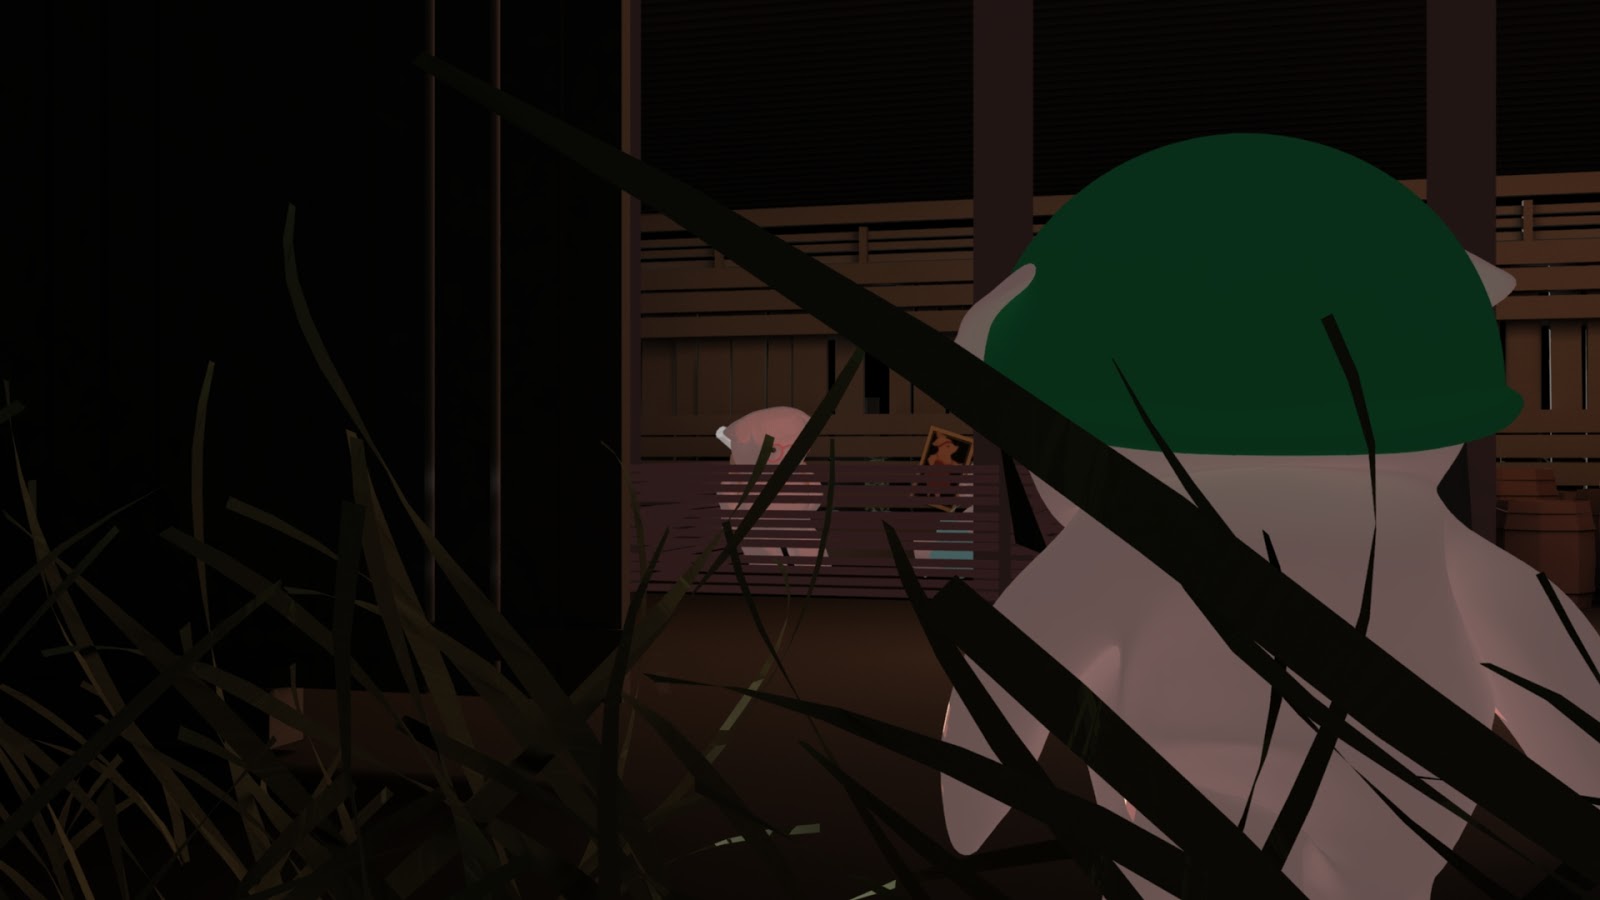
The animation came fairly easily, after a few frames I got the grasp of the way keyframe animation works in Maya and it became quite simple to control. It made me think in a way I've never thought about animation because instead of drawing a character over and over I was moving individual components of parts of a character in order to make them move. So, when I was creating the running sequence I would move the left arm and think about the movement in the right arm, then the legs and the body and head individually. I think this process gave me a better grasp overall about the nature of animation and the ways to think about movement. The movement involved in this scene was a run sequence followed by the character vaulting over the sty fence. The most difficult part I found was the run cycle due to the unusual limb lengths the character had. I did my best to follow a traditional method of creating the run cycle with a similar pattern, modifying it slightly to accommodate for the character's proportions. After this the vault was fairly straight forward and I used some references in order to get the correct positions throughout the duration of the vault, which lasts a short amount of time. During this movement from the 'strong' character, there was also movement from the other characters as they notice his arrival. I tried to make it look natural as if they turned their heads and came to attention as they saw him, hopefully this came off well.
Aforementioned the camera movement was a difficult decision during this particular scene, but in the end the shot following the pig as they enter the barn is one I quite liked and the shot the pans upwards during the vault and the remaining action in the scene worked quite well. Previously, it was difficult to find good camera positioning that documented this scene well, and showed the action in an interesting for the audience.


OUAN504 - Animating, Poster Scene
This scene started as still shot in order to bring the audience further into the environment of the barn. Originally I tried to create a dramatic upward shot of the poster stuck to the wall of the barn. However, after looking at the shot I felt it lacked the element of movement. I had the idea to make it move as if there was a strong wind coming through the visible gaps between the planks that make up the wall of the barn. I thought about what I knew about Maya up to this point and if there was anything I'd learnt that could be applied in order to make the poster move in the natural way that a thin sheet of paper or a thicker piece of material would move. In the end I looked online for methods and tools in Maya that would help me achieve the look I wanted for the poster and came across the nCloth function.
nCloth is a dynamic tool that uses a 'system of linked particles to simulate a wide variety of dynamic polygon surfaces'. I looked at the presets for the material that can be simulated and there was a huge range of things from honey, lava, heavy denim, leather and silk. This showed me straight away the diversity of the tool in that it can create slow flowing liquids like honey, and thin materials like silk. The first step in creating a dynamic free flowing poster for this scene was to recreate it. The reason I had to recreate it is that it needed to have a lot of subdivisions in order to be able to move and be flexible in the way I wanted. I create a polygon plane in the rough dimensions of the previous poster and made it so it had 40 subdivisions Axis, and 40 subdivisions height. This produced a lot of geometry on the surface of the place in order to manipulate it later on. The final step was putting the poster image back on using the lambert shader before importing back into the main barn environment scene.
Once the poster was placed onto the face of the barn wall in it's original arrangement I selected the object and selected the nDynamics menu before going to nMesh > Create nCloth. At this point nothing changes in terms of appearance, but in the outliner you can see that an object titled 'nCloth1' is created along with 'nucleus1'. The nucleus object contains all of the editable attributes associated with the nCloth that has been attached to the object, in this case the poster. There is a huge range of editable attributes including, gravity and wind, air density, wind speed, direction of the wind and noise. These can all be changed to give the desired effect on an object. I chose to have Earth's gravity which is 9.8 m/s² which is also the unit for the 'gravity' option in Maya. From here it was a case of constantly testing the scene and adjusting it until it looked and flowed how I wanted it to. In terms of scene length this scene was relatively short, lasting only around 2 to 3 seconds. Compared to other scenes this one took a fraction of time to render (around a day) because of the scenes content and also the short number of frames. It was nice to be able to have a scene completed so quickly.
Below are screenshots showing the process of taking a plane and allowing it to move using the nCloth function. When you first allocate the nCloth function and play the clip the object falls down vertically by default. To counter this, change from object mode to the mode where you can select the vertices and then select the vertices you want to stay still, creating the illusion that in this case, it's pinned to something. The method used to achieve this is derived using the nConstraint > Transform function, which gives the object points to move around. Once this was done I selected an appropriate preset to start with, that could reasonably act as if it was a thin piece of paper. I experimented with several different presets before settling on the heavy denim preset, and selected 'blend 10%' to alter the way the material moved. Another way I chose to make the object look heavier and less 'light weight' was to increase the air density. Increasing the air density makes it appear as if the object is moving or flowing in a thicker medium. The effect this has however, is make the object look heavier which I thought looked better. For this opening scene I wanted to make it appear as if the wind affecting the poster in the environment was quick and possessed a high 'wind speed'. So for the purpose of this scene, I bumped the wind speed up to around 15. In addition to this I discovered that the direction of the wind had a good affect on the way the wind interacted with the object, in this case either pinning it to the wall or pushing it away from the barn wall as if the wind was coming through the gaps - which is what I wanted to make it look like originally. I changed the direction to 10 in the y axis and 4 in the z axis to help make this look more effective. This came as a result of some experimentation with wind direction and attempting to understand how the direction of the wind interacted with the poster object in this specific environment. For the final scene, I had some problems making it look like it was night time outside in combination with the rendering and mental ray. The problem occurring showed in the script editor as 'render completed' despite not having rendered anything. Wing also had this problem at some points trying to render scenes and I believe the problem lies within mental ray, but I never discovered the source of the problem and was only able to fix it by playing around with different settings. For this scene I made it so the 'physical sun and sky' was an ambient white light, giving the illusion of moonlight outside, so I hope this is communicated well to the audience in combination with the other scenes around it set at night time. Overall I was happy with the way this scene turned out, and found it to be quite effective despite its simplicity, if I could have improved on it however, I could have liked to make the grass outside the barn, which is visible through the gap in the planks move as well as the poster. Adding a sense of dynamic and simultaneous movement across different objects in view during the scene. I was happy with what I had achieved however, and didn't want to spend too much time on it due to the fact it was such a short scene in comparison to others and time was pressing on towards the deadline.


OUAN504 - Animating, Establishing Shot
As this was the opening scene and consequently the first scene that the audience will see when they watch the animation, Wing and I wanted to be concise and to the point with making sure the audience recognised the setting and understood the environment they were watching. To do this, I thought of using perhaps a repetitive or overdone shot involving focusing on the moon before dropping down to near ground level in the surroundings. Despite being perhaps a little generic, we thought the shot would work well and be instantly recognisable in terms of the time of day and setting the initial tone of the production. No animation will take place during this scene in terms of character movement as the characters are yet to be introduced at this point. However, careful consideration and thought will be dedicated to the use of camera in this scene to produce an interesting visual introduction to the piece - and I think this is a key element to the animation as much as any other.
I started the scene by creating the relevant cameras and positioning them accordingly. I found the best way to navigate the different cameras was by using the panel view, and once this was open I could view the different camera using different perspectives. Using this method I set the camera up that was intended to record the vertical shot. This took some careful tweaking to make sure it was in a position where once the camera was moved downwards it stopped in the correct position to frame the establishing shot. A tool that helped enormously when create the smooth transition for the camera was the graph editor. The graph editor encourages and aids in the ability to make smooth animation. It gives you the tools to adjust the rotation, translation and scale of a character or object on a graph with the x axis being the frames the action takes place within and the y axis being the position in the Maya workspace that the object is. Using the graph editor is an extremely accurate and versatile way to animate and control the movement of the animation. Within the graph editor there is a range of tools to help with this, such as the ability to play with the tangents. You can alter these by hand, manually. Or, use the preset options such as 'linear', 'spline', and 'fixed'. These presets essentially alter the shape of the line on the graph and consequently the motion. For example, making a tangent, 'linear' would straighten out the tangent and also the movement of that specific action, causing a steady pace of movement as oppose to varied movement. These are some of the tools I used to get the movement I wanted, and it was important for the scene to make the movement as smooth as possible along the line it was moving.


I started the scene by creating the relevant cameras and positioning them accordingly. I found the best way to navigate the different cameras was by using the panel view, and once this was open I could view the different camera using different perspectives. Using this method I set the camera up that was intended to record the vertical shot. This took some careful tweaking to make sure it was in a position where once the camera was moved downwards it stopped in the correct position to frame the establishing shot. A tool that helped enormously when create the smooth transition for the camera was the graph editor. The graph editor encourages and aids in the ability to make smooth animation. It gives you the tools to adjust the rotation, translation and scale of a character or object on a graph with the x axis being the frames the action takes place within and the y axis being the position in the Maya workspace that the object is. Using the graph editor is an extremely accurate and versatile way to animate and control the movement of the animation. Within the graph editor there is a range of tools to help with this, such as the ability to play with the tangents. You can alter these by hand, manually. Or, use the preset options such as 'linear', 'spline', and 'fixed'. These presets essentially alter the shape of the line on the graph and consequently the motion. For example, making a tangent, 'linear' would straighten out the tangent and also the movement of that specific action, causing a steady pace of movement as oppose to varied movement. These are some of the tools I used to get the movement I wanted, and it was important for the scene to make the movement as smooth as possible along the line it was moving.


Sunday, 29 November 2015
OUAN504 - Testing & Animating the Time-lapse Scene
The first scene I approached and tested to see how it worked was in my mind one of the more interesting and complex scenes. The way it was produced wasn't complex at all, and in fact was incredibly simple, but it seemed like a complex concept at first and I wanted to test it to see how it worked out once rendered and to some extent completed. Since it was a test I tried to cut the render time as much as I could and rendered it in a 640 x 480 format, so although the quality suffered, I was able to produce a result reasonably quickly. The way the physical sun and sky works is based on the angle of the arrows that represent it. So if they arrows are vertical then it translates to the idea that the sun is at it' highest point and that would be mid-day. This would produce a very bright scene with very short shadows and look like a sunny day. The more the angle of the arrows is rotated the lower the sun gets until the arrows are completely horizontal. At this point it means that the sun has essentially set and their may be a very faint glow or no light left at all at this point.
Overall, I'm quite happy with how the test turned out. There is, however a couple of aspects I think I need to refine before I render the final version. Firstly, I will of course include some extra environmental objects such as grass and trees. This will add a little more depth and realism to the scene. Furthermore, I want to change the camera angle. I think for scenes such as a time-lapse scene one of the most noticeable things and what I believe can make a huge different with this scene specifically since it's a still shot, is the angle of the camera. I would like the final shot to be a lot more dynamic than this. I felt that with this shot you're not getting the full view of the barn and this overall affects the feeling you get when watching it. I think a good shot for this scene would be a three-quarter view from the side of the barn. Another huge factor in the angle of the camera specific to this scene is that I want the shadows to fall as much as possible across the scene. This is mostly reliant of the positioning of the physical sun and sky, combined with the angle that it's being viewed at. Next, for the final version I'm going to take the scene and make it longer, probably by a second or two so that I can extend the rotation of the physical sun and sky and gather a greater range of times in the day. I also want the transition between the times of day to be a bit slower, hence why I want to extend it in the final version. The main point of this is to have a good range of footage that can be incorporated and cut where possible to include the most successful sections. The image below demonstrates the angle of the camera I wanted to use in relation to the barn and the environment.

The final version turned out pretty much how I wanted it to look. I was able to get a great range of times of day by rotating the physical sun and sky through a little more than 360 degrees, and the duration of the time-lapse was around six to seven seconds. The only drawback of this however was that it comprised around 144 frames in total, which took around five days render time across several computers. This was mainly due to the scope of the scene and it included every object that had been modelled and included in order to make the scene as dynamic, cinematic and as successful as it could be. One thing I do want to do to further this slightly is alter the lighting and play around with the colour during the post-production stage. I think this is the stage where the scene will finally come together and the colours can be corrected or even improved to make the scene a lot better for viewing. Whist I was animating the scene and going over the rendered frames I was trying to think of a suitable soundtrack that would fit the pace of the scene and hopefully tie everything together. I think this is quite an important scene given the context of the narrative, so I want to enhance it as much as I can to make it more dramatic. This would increase the value and effect of the 'punchline' at the end of the animation.
Overall, I'm quite happy with how the test turned out. There is, however a couple of aspects I think I need to refine before I render the final version. Firstly, I will of course include some extra environmental objects such as grass and trees. This will add a little more depth and realism to the scene. Furthermore, I want to change the camera angle. I think for scenes such as a time-lapse scene one of the most noticeable things and what I believe can make a huge different with this scene specifically since it's a still shot, is the angle of the camera. I would like the final shot to be a lot more dynamic than this. I felt that with this shot you're not getting the full view of the barn and this overall affects the feeling you get when watching it. I think a good shot for this scene would be a three-quarter view from the side of the barn. Another huge factor in the angle of the camera specific to this scene is that I want the shadows to fall as much as possible across the scene. This is mostly reliant of the positioning of the physical sun and sky, combined with the angle that it's being viewed at. Next, for the final version I'm going to take the scene and make it longer, probably by a second or two so that I can extend the rotation of the physical sun and sky and gather a greater range of times in the day. I also want the transition between the times of day to be a bit slower, hence why I want to extend it in the final version. The main point of this is to have a good range of footage that can be incorporated and cut where possible to include the most successful sections. The image below demonstrates the angle of the camera I wanted to use in relation to the barn and the environment.

The final version turned out pretty much how I wanted it to look. I was able to get a great range of times of day by rotating the physical sun and sky through a little more than 360 degrees, and the duration of the time-lapse was around six to seven seconds. The only drawback of this however was that it comprised around 144 frames in total, which took around five days render time across several computers. This was mainly due to the scope of the scene and it included every object that had been modelled and included in order to make the scene as dynamic, cinematic and as successful as it could be. One thing I do want to do to further this slightly is alter the lighting and play around with the colour during the post-production stage. I think this is the stage where the scene will finally come together and the colours can be corrected or even improved to make the scene a lot better for viewing. Whist I was animating the scene and going over the rendered frames I was trying to think of a suitable soundtrack that would fit the pace of the scene and hopefully tie everything together. I think this is quite an important scene given the context of the narrative, so I want to enhance it as much as I can to make it more dramatic. This would increase the value and effect of the 'punchline' at the end of the animation.
OUAN504 - Animation
We divided the animating work load in half and took on eight scenes each to comprise the full production. My scenes were a mixture of different things, some of which I wasn't quite sure how to approach at first, and I had to look some things up online. For example, aside from character animation, I also undertook some of the environmental animation, this was through the movement of camera and in one particular scene, the time-lapse scene, the movement of the physical sun and sky. The time-lapse scene was the first I did because it was going to be used several times throughout the animation and I was unfamiliar with how to do it. Ultimately it was a lot simpler than I thought and it was merely a case of key framing the rotation of the physical sun and sky on its axis. I did just over one full rotation over 120 frames, giving us 5 seconds of footage to use as we like, since the animation will be 24 frames per second when it's finished. The main challenge here with this scene wasn't actually the animation it was setting up a shot that I liked. I played around for quite a while moving the camera and rendering the scene over and over until I was happy with it. I wanted to make sure that throughout the day that is shown there is a nice variation of shadows and lighting, for this I made sure to get a relatively close up shot of the barn with the fence in the foreground. Being this close to the barn allowed the shadows from the fence, grass, barrels and other objects to be clearly visible, this created a cinematic and dramatic feeling scene which is what I was hoping to achieve.
It was during this stage when I started using, for the first time the book I had purchased over a year ago now - The Animators Survival Kit. I have of course read this book for entertainment, and enjoyed reading it in the past. However, for some reason unknown to me until this point have never used it for a more educational purpose. Well, on one particular scene as I started to animate characters I went into it blind and ignorant to the kind of reference and information I needed in order to complete this task. I was trying to complete a simple running cycle, and it just didn't look right. I took out the book and started reviewing the extremely detailed section of running and walk cycles. This made the entire process a lot easier and I immediately found the animating process more rewarding and enjoyable as a whole. I found myself using and putting into practice all of the concepts that we've been taught over the past year and making sure the movement was smooth, accurate and as realistic as it could be given the fact I was animating an anthropomorphic pig running on his hind legs. I suppose this is the first time, despite being on an animation course I felt like I was animating something for real. In the past I had mostly based my projects around the camera and the pre-production and post-production processes in order to create work but this felt a lot closer to real animation, and I was enjoying the whole process more than I ever thought I would. Throughout each scene involving character movement I found it thrilling to comprise a whole scene of movement and interaction from what started as essentially motionless 3D models of the characters and surrounding environment. I liked building up the movement and testing out the limits of camera movement and angles, whilst bringing the characters to life. In a sense it was like building up layers of movement until the scene was in a sense, fully alive. For example, whilst animating a scene where one of the pigs enters the barn by running through the entrance, I started out with his motion and then moved on to create subtle movement with the other characters by moving their heads and changing their positions within the scene. After the characters had been completed I moved on to exploring the way the scene could be translated to the audience through the use of the camera. I found this exciting to experiment with as each different angle and method of showing the scene gave a different result, and a different feel for the same action - it was a new avenue for me to explore character movement combined with camera direction in this way and I wanted to see how far I could push myself to tell the story in the best possible way with what I was learning.

It was during this stage when I started using, for the first time the book I had purchased over a year ago now - The Animators Survival Kit. I have of course read this book for entertainment, and enjoyed reading it in the past. However, for some reason unknown to me until this point have never used it for a more educational purpose. Well, on one particular scene as I started to animate characters I went into it blind and ignorant to the kind of reference and information I needed in order to complete this task. I was trying to complete a simple running cycle, and it just didn't look right. I took out the book and started reviewing the extremely detailed section of running and walk cycles. This made the entire process a lot easier and I immediately found the animating process more rewarding and enjoyable as a whole. I found myself using and putting into practice all of the concepts that we've been taught over the past year and making sure the movement was smooth, accurate and as realistic as it could be given the fact I was animating an anthropomorphic pig running on his hind legs. I suppose this is the first time, despite being on an animation course I felt like I was animating something for real. In the past I had mostly based my projects around the camera and the pre-production and post-production processes in order to create work but this felt a lot closer to real animation, and I was enjoying the whole process more than I ever thought I would. Throughout each scene involving character movement I found it thrilling to comprise a whole scene of movement and interaction from what started as essentially motionless 3D models of the characters and surrounding environment. I liked building up the movement and testing out the limits of camera movement and angles, whilst bringing the characters to life. In a sense it was like building up layers of movement until the scene was in a sense, fully alive. For example, whilst animating a scene where one of the pigs enters the barn by running through the entrance, I started out with his motion and then moved on to create subtle movement with the other characters by moving their heads and changing their positions within the scene. After the characters had been completed I moved on to exploring the way the scene could be translated to the audience through the use of the camera. I found this exciting to experiment with as each different angle and method of showing the scene gave a different result, and a different feel for the same action - it was a new avenue for me to explore character movement combined with camera direction in this way and I wanted to see how far I could push myself to tell the story in the best possible way with what I was learning.

OUAN504 - Intro Sequence
As the narrative and storyboards have been refined several times though out the project Wing and I have been discussing each scene at length. Specifically, what kind of shot we want to have, the time of day and the positioning of the characters for example. For the intro sequence I had the idea to combine the first two scenes into one shorter scene in order to save valuable time and allocate more time for other scenes within the 1 minute time frame. The first two scenes originally consisted of a wide-long shot of the barn, followed by a quick cut to a closer shot of the barn through the wire fence. Although we both liked this idea, it would have been quite an uninteresting way to start the animation and so I came up with the idea to open with a shot of the moon, indicating to the audience the fact it's night time and from there, have the camera track vertically downwards and setting into a still shot of the barn from behind from half a second to around a second in length - just to allow the audience to absorb the information about where this is set. The idea behind the original second shot of the barn through the fence was to make sure the idea of the fence was reinforced to the audience. This aspect is important because it's the characters main obstacle in escaping, and it needs to be depicted early on so that the premise of the narrative is relayed as soon as possible. The behind shot of the barn allows for the information to still be translated but in a different way. The shot of the barn from behind also includes the fence, so in a way you're looking at the fence from the inside out, the way the characters would be looking at it, rather from the outside in, as the audience. This also means that the camera is never outside the fenced off area of the barn, and in a subtle way are experiencing the same environment as the characters for the duration of the animation. This in turn may induce a more accessible way for the audience to empathise with the characters.
I wanted to see what the angle was like so I rendered a frame using a good amount of daylight from the physical sun and sky. Once I was happy with the angle in terms of the direction of the camera I re-rendered the scene using a night time sky so I could see what kind of effect it was going to have in the final animation, with the scene being set at night. I also wanted to make sure with the shot that there was a sense of drama attached to it, as well as revealing a certain amount of wire fence towards the right side of the shot, as that was the original intention of the scene - to emphasise this to the audience. The first night time render I did, I felt it was too dark, the scene was only lit by the interior lighting within the barn, which only projected a faint glow onto the surrounding grass and the wire fence. I decided to add a natural light source in the form of the moon. To recreate this type of white atmospheric glow I created a spotlight with a low intensity, just enough to illuminate the fence and make it the lightest object and consequently the main focal point of the scene.


I showed Mat the sequence I had in mind, and after reviewing what I'd done we decided it wasn't quite right for the scene. Previously I had almost a vertical crane camera moving downwards from the shot of the sky to that of the barn. It felt like after 5 seconds or so of this that it was too simple and needed something more. Furthermore, normally this shot is done using a pan or a tilt, and not that kind of vertical tracking shot I had put in place before it was revised. I wanted an establishing shot with pretty much the same angle on the barn as before, but the transition to get to the establishing shot I felt could be a lot stronger than it was. Mat demonstrated the way the graph editor can be used to manipulate the keyframes, how to single out various attributes such as rotate x, y and z for example. Another hugely useful way to manipulate the action is to use the handles, or tangents in order to give a greater level of control over what happens. I've spent a short while playing around with it, and I've made certain areas slower and others faster. I also made it so the final establishing shot wasn't as tilted as before and is more of a square on standard shot, to complete the movement.
The second image below shows the different between the two final establishing shots, the one I had to start with and the one I finished with. Like I previously mentioned, one of the key purposes of the scene is not just to establish the scene but show the audience the wire fence and imply that the fencing is keeping the characters (which are introduced in the next scene) inside the farm, and gives the narrative a greater and more emphasised purpose.


I wanted to see what the angle was like so I rendered a frame using a good amount of daylight from the physical sun and sky. Once I was happy with the angle in terms of the direction of the camera I re-rendered the scene using a night time sky so I could see what kind of effect it was going to have in the final animation, with the scene being set at night. I also wanted to make sure with the shot that there was a sense of drama attached to it, as well as revealing a certain amount of wire fence towards the right side of the shot, as that was the original intention of the scene - to emphasise this to the audience. The first night time render I did, I felt it was too dark, the scene was only lit by the interior lighting within the barn, which only projected a faint glow onto the surrounding grass and the wire fence. I decided to add a natural light source in the form of the moon. To recreate this type of white atmospheric glow I created a spotlight with a low intensity, just enough to illuminate the fence and make it the lightest object and consequently the main focal point of the scene.


I showed Mat the sequence I had in mind, and after reviewing what I'd done we decided it wasn't quite right for the scene. Previously I had almost a vertical crane camera moving downwards from the shot of the sky to that of the barn. It felt like after 5 seconds or so of this that it was too simple and needed something more. Furthermore, normally this shot is done using a pan or a tilt, and not that kind of vertical tracking shot I had put in place before it was revised. I wanted an establishing shot with pretty much the same angle on the barn as before, but the transition to get to the establishing shot I felt could be a lot stronger than it was. Mat demonstrated the way the graph editor can be used to manipulate the keyframes, how to single out various attributes such as rotate x, y and z for example. Another hugely useful way to manipulate the action is to use the handles, or tangents in order to give a greater level of control over what happens. I've spent a short while playing around with it, and I've made certain areas slower and others faster. I also made it so the final establishing shot wasn't as tilted as before and is more of a square on standard shot, to complete the movement.
The second image below shows the different between the two final establishing shots, the one I had to start with and the one I finished with. Like I previously mentioned, one of the key purposes of the scene is not just to establish the scene but show the audience the wire fence and imply that the fencing is keeping the characters (which are introduced in the next scene) inside the farm, and gives the narrative a greater and more emphasised purpose.


OUAN504 - Rigging a Character
Rigging the character was quite a challenging aspect to this project. One of the main reasons for this is that they're is a lot of different processes which are quite difficult to keep track of. Despite being a complicated process it is quite rewarding, and even an enjoyable thing to learn to do. My main point of reference whilst rigging the 'smart pig' character was the collection of tutorial videos that Mat made in order to learn how to rig a character. It was relatively easy following the guides in the respect that they were informative and easy to follow but since I had never done anything like it before there was an element of doing something for the first time which made it a little more difficult. However, the challenge came when adjusting the principles of rigging a character and adapting it to suit the characters we had made. For example, our characters' proportions are much different to the proportions of the character that we used as an example. Our pig characters had short limbs by comparison, so much so that we didn't need to rig a forearm for the actual character. It also made the distribution of the skeleton hard to nail down because the joints are a lot closer together. This section wasn't too difficult however. Below is an image illustrating the different viewpoints when creating the skeleton for one of our characters and using the different view points made it a lot easier to position the joints. I started with the left side of the body and mirrored the skeleton, similar to the method Mat showed us with the demo model. The process begins with the left leg, then the left arm, then the main body including the neck, chest, back and hip, ending with the head and eyes.


The process for creating the controls once the skeleton was complete involved using something I had never used before when it came to shapes - we used NURBS circle and square. These shapes are flat outlines of shapes that in turn can be used to create the majority of the controls, even if they require some some manipulation to create the eyes for example. In others areas such as the neck, chest and back, a simple circle was also created. However for the knee joints, feet, hands and the master control, a different approach was taken in order to create a control in the shape of that specific body part. For example, a mitten was created using the CV curve tool and adjusting the vertices of the curve to accommodate the shape of the characters hand. Once all of the controls were completed they had to be coloured in order to differentiate between the right and left side of the body. This is done for number or reasons, firstly so that when controls cross over during the animation process the left controls are easily distinguishable from the right controls and vies versa. Also, it allows for the same principle to be used if different characters are together in close quarters, making different characters joints and controls clearer to distinguish, avoiding confusion in the process. They were coloured using the association of blue for the left and red for the right. A much more complicated process to me at least during the whole rigging process was the parenting and constraining of the skeleton to the mesh and furthermore creating the controller hierarchy. This was due to again the simple unfamiliarity with the process I was undertaking. It was helped quite a lot however by using the 'hypergraph' window to view the inputs and outputs in relation to the controls and the skeleton. The functions that helped with this task were predominantly the Constrain > Parent which 'constrains both the rotational and translation values of an object (follower) to another object (leader) and Constrain > Orient which contains all of the rotation values to the object it is contained to. Overall, I would say that this was the most difficult part of the rigging processes but in the future I'd be more confident as I have had some previous experience now.

A step that was quite easy to complete but tedious at the same time was creating the controllers, and following this the IK handles for the legs. I actually found this process on the whole fairly easy, however there were a couple of instances where I thought I had done something wrong and forgot where I was up to when constraining various sections of the model. Another thing that created some confusion a couple of times is that I wasn't sure if something had completed on been constrained properly after I had done it. In other words, occasionally I had forgotten what I had done. However, with some checking I was able to regather myself and continue the process without too much trouble. The rigging experience was probably one of the most technical aspects when it came to the development of the characters on this particular project, but it was exciting knowing that this was the process that was going to allow them to move, and so I wanted to make sure I did it as well as I could. Not having done this before in Maya, I was concerned that the character's movement would be insufficient to move and create the types of movement that I wanted from them. This would have been more of a problem to tackle in the production and design of the characters so I just had to go with it and hope for the best at this point. There were a number of functions and tools in Maya that made the entire process a lot easier, firstly of course the ability to view the character from the front and side view helped tremendously in being able to view what was going on from a good viewpoint, rather than having it distorted in the perspective view. Another was the 'x-ray on joins', 'x-ray' and 'wireframe on shaded' options that helped a lot when trying to compose the skeleton and the joints, as well as view the inner workings of the model. Without these functions the task would have been a lot harder and prolonged.


One of the final steps of the rigging process involved creating the orient groups. These essentially clean up all of the different controller and assemble them into a type of hierarchical group. When the controllers are grouped like this it means that you can select the orient group and control that area of the model. For example, if 'root_orientgrp' was selected then the controls linked to the root would be selected and free to move as you wanted them to. This is a good way to work the controllers, and is also a neat way to organise them.
The final stage of the process when the model was complete and attached to the controllers was to do the weighting. This is relatively straight forward and it involves painting influence onto the model in order to determine where the joint is affecting the geometry. The influence is determined by the colour that is painted, with white being 100% influence and black being 0%. This is the kind of process where it's relatively easy to pick up and get used to after you've spent a little time doing it. After this stage is complete and the influences have been accurately added to the model, the character is fully completed and ready to be animated.


The process for creating the controls once the skeleton was complete involved using something I had never used before when it came to shapes - we used NURBS circle and square. These shapes are flat outlines of shapes that in turn can be used to create the majority of the controls, even if they require some some manipulation to create the eyes for example. In others areas such as the neck, chest and back, a simple circle was also created. However for the knee joints, feet, hands and the master control, a different approach was taken in order to create a control in the shape of that specific body part. For example, a mitten was created using the CV curve tool and adjusting the vertices of the curve to accommodate the shape of the characters hand. Once all of the controls were completed they had to be coloured in order to differentiate between the right and left side of the body. This is done for number or reasons, firstly so that when controls cross over during the animation process the left controls are easily distinguishable from the right controls and vies versa. Also, it allows for the same principle to be used if different characters are together in close quarters, making different characters joints and controls clearer to distinguish, avoiding confusion in the process. They were coloured using the association of blue for the left and red for the right. A much more complicated process to me at least during the whole rigging process was the parenting and constraining of the skeleton to the mesh and furthermore creating the controller hierarchy. This was due to again the simple unfamiliarity with the process I was undertaking. It was helped quite a lot however by using the 'hypergraph' window to view the inputs and outputs in relation to the controls and the skeleton. The functions that helped with this task were predominantly the Constrain > Parent which 'constrains both the rotational and translation values of an object (follower) to another object (leader) and Constrain > Orient which contains all of the rotation values to the object it is contained to. Overall, I would say that this was the most difficult part of the rigging processes but in the future I'd be more confident as I have had some previous experience now.

A step that was quite easy to complete but tedious at the same time was creating the controllers, and following this the IK handles for the legs. I actually found this process on the whole fairly easy, however there were a couple of instances where I thought I had done something wrong and forgot where I was up to when constraining various sections of the model. Another thing that created some confusion a couple of times is that I wasn't sure if something had completed on been constrained properly after I had done it. In other words, occasionally I had forgotten what I had done. However, with some checking I was able to regather myself and continue the process without too much trouble. The rigging experience was probably one of the most technical aspects when it came to the development of the characters on this particular project, but it was exciting knowing that this was the process that was going to allow them to move, and so I wanted to make sure I did it as well as I could. Not having done this before in Maya, I was concerned that the character's movement would be insufficient to move and create the types of movement that I wanted from them. This would have been more of a problem to tackle in the production and design of the characters so I just had to go with it and hope for the best at this point. There were a number of functions and tools in Maya that made the entire process a lot easier, firstly of course the ability to view the character from the front and side view helped tremendously in being able to view what was going on from a good viewpoint, rather than having it distorted in the perspective view. Another was the 'x-ray on joins', 'x-ray' and 'wireframe on shaded' options that helped a lot when trying to compose the skeleton and the joints, as well as view the inner workings of the model. Without these functions the task would have been a lot harder and prolonged.


One of the final steps of the rigging process involved creating the orient groups. These essentially clean up all of the different controller and assemble them into a type of hierarchical group. When the controllers are grouped like this it means that you can select the orient group and control that area of the model. For example, if 'root_orientgrp' was selected then the controls linked to the root would be selected and free to move as you wanted them to. This is a good way to work the controllers, and is also a neat way to organise them.
The final stage of the process when the model was complete and attached to the controllers was to do the weighting. This is relatively straight forward and it involves painting influence onto the model in order to determine where the joint is affecting the geometry. The influence is determined by the colour that is painted, with white being 100% influence and black being 0%. This is the kind of process where it's relatively easy to pick up and get used to after you've spent a little time doing it. After this stage is complete and the influences have been accurately added to the model, the character is fully completed and ready to be animated.


Subscribe to:
Comments (Atom)